Troubleshooting Then Root Cause Analysis

It Broke – Now What?
A piece of equipment breaks. Now what do you do? The most common answer is to get a new part (seal, pump, shaft, rotor, …) and replace the broken one. Get the machine back online and production back up fast.
If the broke/fix is your repair method, you might notice that the same things break over and over again. Fixing the same problems over and over again can get expensive (and perhaps, even deadly).
So you might ask,
Why do they continue to fail?
The answer:
Because you haven’t addressed the root causes of the failure.
You are only addressing the symptoms.
The answer seems simple. Do a root cause analysis. Something simple like 5 Whys.
But you might be surprised that you really aren’t ready for root cause analysis. Why? Because you need to troubleshoot the failure BEFORE you perform a root cause analysis.
Mechanical Failure Example
This is a pump example. In this example, an older facility was being refurbished. Piping was being replaced, and pumps were being rebuilt to improve reliability.
The piping and pumps were removed, and new piping was installed. Unfortunately, the pump rebuilds were delayed due to labor shortages at the rebuild shop. The rebuilt pumps were eventually rebuilt, returned, and installed six months later.
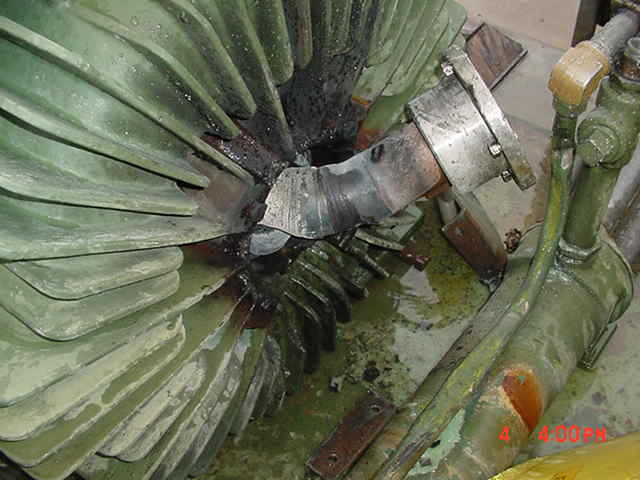
As part of the process, the pumps were started and “run-in” in a 72-hour initial startup test. Unfortunately, one of the pumps failed at about the 24-hour point in the test. It appeared that a bearing had failed. The pump was removed and returned to the shop to be rebuilt on an expedited basis.
In a week, the pump was rebuilt and returned. The contract pipefitters reinstalled the pump, and the test was attempted for a second time. After 16 hours, the pump failed again, once again due to a bearing failure.
The pump was returned to the shop with a request for the best mechanic to perform the rebuild. The entire rebuild process was performed by the most experienced mechanic, and the supervisor performed quality checks throughout the rebuild process. The pump was returned with the statement that it had been “blueprinted” to the original design specifications and successfully run on a test stand for 48 hours.
The pump was reinstalled by the contact pipefitters, and the acceptance test was resumed. This time, the pump failed after 20 hours.
Let’s look at potential causes of the failure in the Equifactor® Troubleshooting Tables below.

We have selected the “short bearing life” symptom in the Centrifugal Pump troubleshooting table. The first task is to eliminate as many of the causes as possible. These were the possible causes that were eliminated:
- Bent Shaft – shaft was checked in the rebuild process and met specifications.
- Contaminated Lubricant – a fresh batch of lubricant was obtained and tested before use.
- Electrical Troubles in the Motor – The motor was inspected and tested during the test run with no problems.
- Excessive Cooling of Water-cooled Bearing – Not a water-cooled bearing.
- Excessive Gease or Oil – Lubrication was checked during installation and was not excessive.
- Excessive Radial Trust (single volute pump) – this was a double volute pump.
- Excessive Wear of Internal Surfaces – wear was checked during the rebuild process and verified as meeting specifications by the supervisor.
- Improper Installation of Anti-friction Bearings – bearing installation was checked by the supervisor during the final rebuild.
- Insufficient NPSH – Net positive suction head was checked after installation and was adequate.
- Lack of Lubrication – Lubrication was checked by the supervisor during the rebuild and was adequate.
- Misalignment – Alignment was checked when the pump was installed before the piping was attached and found to be within specifications.
- Operating Below Minimum Recommended Flow – Flow was normal during the test.
- Operating Near Critical Speed – Same speed as before rebuild and same as other pump that is not failing.
- Unbalanced Pump or Driver – Balance of the pump and the driver were checked before installation and were within specifications.
- Wrong Grease or Oil – Grease was checked to be correct by the mechanic and the supervisor.
That only left one possible cause: Casing Distorted Due To Pipe Strain.

Facility personnel decided to observe the installation by the contract pipefitters. During the installation, the pipefitters were observed using a come-along to align the pipe with the pump’s flanges. The installation was haulted and the pipefitters were asked about the practice. The pipefitters said that this process was “normal” and nothing to worry about. Specifications for alignment were requested, and the personnel on scene said there were no specifications for pipe alignment. That was later found to be incorrect. Specifications were that the bolts should be aligned with no force being used.
All of the previous failures were deemed to be because of the improper alignment of the piping. The piping had to be removed and reinstalled to meet specifications.
On further investigations, it was found that the initial piping installation did not agree with the design and installation requirements. Also, the required quality checks after installation of the piping had not been performed.
Conclusions
Sometimes assumptions about failures can be correct. Other times, they can lead an investigation astray. In this case, the assumed failure was in the pump rebuild process. However, the real failures were in the piping installation and the pump installation. Thus, efforts to “fix” the rebuild process were a waste of time.
Also, the use of the Equifactor® Troubleshooting Tables BEFORE the rebuild and installation could have been better planned so that potential failures could have been addressed BEFORE the first failure. A procedure could have been written for the rebuild and installation process that could have included all the key things to check (including the piping alignment) before the first test was ever run. This would have saved considerable time and considerable costs.
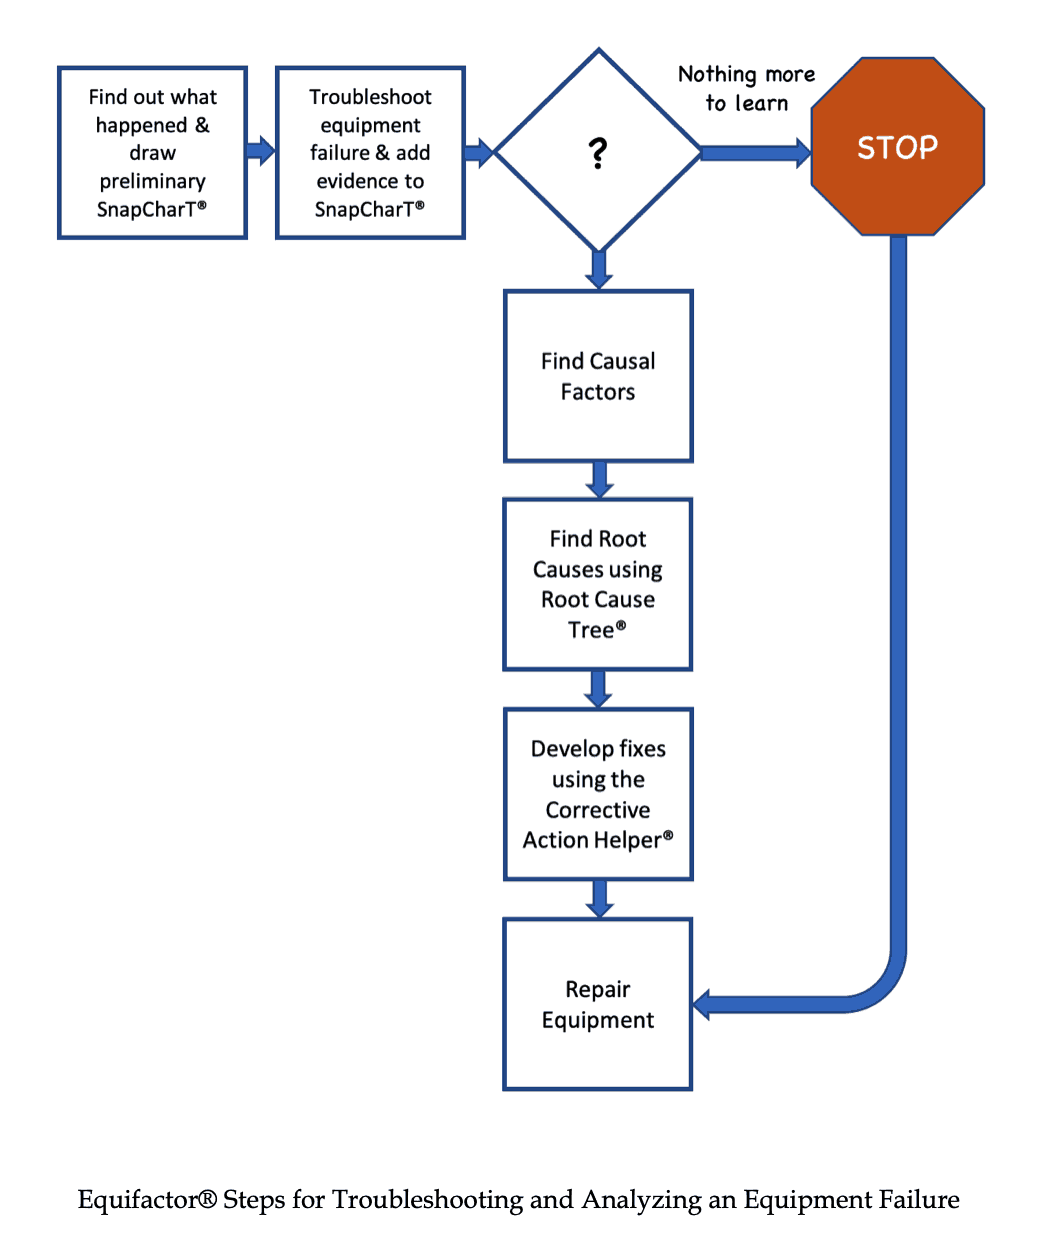
However, the troubleshooting above is only the start of the root cause analysis. In the process below, we still have to complete a SnapCharT®, identify Causal Factors, and find and fix Root Causes to make sure this type of problem doesn’t happen again.
Learn More About Equifactor® Troubleshooting
To learn more about Equifactor® Troubleshooting, watch the video above.
Then attend an Equifactor® Troubleshooting and TapRooT® Root Cause Analysis Course. See the upcoming course dates HERE, including an upcoming 3-Day Virtual Equifactor® Troubleshooting and TapRooT® Root Cause Analysis Course.